Window msvc Microsoft C++ 生成工具 - Visual Studio
MinGW 首先使用 scoop 安装 msys2(在 main bucket 中就有):scoop install mingw
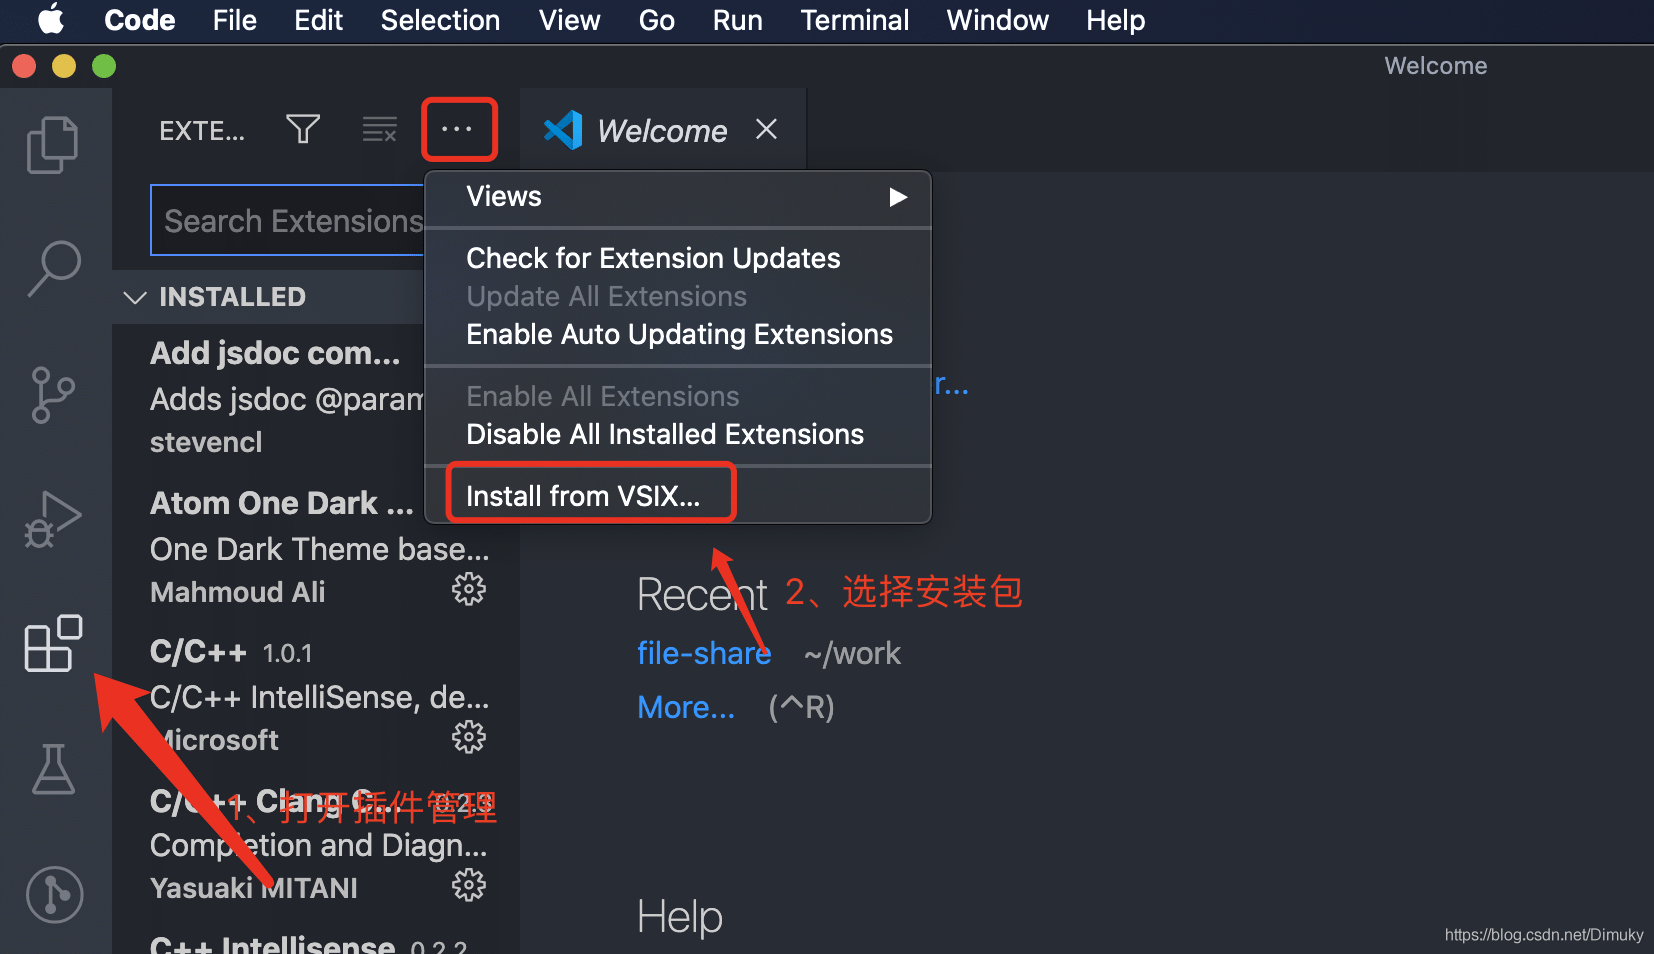
Clangd 在 vscode 扩展商店中搜索 clangd 下载,完成后右下角会弹窗提醒你安装 clangd server,点击 Install 即可直接安装,这一点非常便捷。
自身配置 Configuration (llvm.org) 为什么 windows 上的 clangd 找不到标准头文件 clangd 找不到 iostream 和其他标准库 msvc with clangd · clangd/clangd · Discussion #1573 (github.com) <driver> -E -v -x c++ - 查看是否支持 clangd 用于尝试从驱动程序中提取内置包含的相同标志
在工程目录下新建一个文件 ,名为 .clangd,或者编辑 %LocalAppData%\clangd\config.yaml, 通常为 C:\Users\Bob\AppData\Local\clangd\config.yaml
在文件中添加
1
2
3
4
5
6
7
8
9
10
11
12
13
14
15
CompileFlags: Add: ["-IC:\\Program Files\\Microsoft Visual Studio\\2022\\Community\\VC\\Tools\\MSVC\\14.34.31933\\include" ] Diagnostics: UnusedIncludes: Strict ClangTidy: Add: [ performance-* , bugprone-* , portability-* , modernize-* , ] Remove: modernize-use-trailing-return-type CheckOptions: WarnOnFloatingPointNarrowingConversion: false
Mingw clangd 默认直接绑定了 VS 路径下的 MSVC 库,如果需要修改为 MinGW 则要改动 target。
1 2 3 4 5 6 7 8 9 10 11 12 13 14 15 16 17 18 19 20 21 22 23 24 "clangd.arguments" : [ "--query-driver=D:\\Scoop\\apps\\msys2\\current\\mingw64\\bin\\x86_64-w64-mingw32-g++.exe" , ] , "clangd.path" : "D:\\Scoop\\apps\\llvm\\current\\bin\\clangd.exe" , "clangd.fallbackFlags" : [ "-ID:\\Scoop\\apps\\msys2\\current\\mingw64\\include\\c++\\12.2.0" , "-ID:\\Scoop\\apps\\msys2\\current\\mingw64\\include" , "-ID:\\Scoop\\apps\\msys2\\current\\mingw64\\include\\c++\\12.2.0\\x86_64-w64-mingw32" , "-I${workspaceFolder}/src/includes" , "--target=x86_64-w64-windows-gnu" , ] ,
逐一解释:
header-insetion: 是否自动引入头文件,这里设置的是从不。
completion-style: 设置提示格式,这里设置的是展示所有细节。
query-driver:设置 clangd server 的驱动库路径,这里我设置了 mingw 的路径,但似乎没有效果(clangd 仍然链接到了 MSVC 当中)
std:设置 c++ 标准
-I:设置用户自定义的库路径
–target:设置链接目标,这里改成了 GNU,即对应 MinGW
Msvc msvc 编译器较快(推荐)
1 2 3 4 5 6 7 8 9 10 11 12 13 14 15 16 17 18 19 "clangd.arguments" : [ "--query-driver=C:\\Program Files\\Microsoft Visual Studio\\2022\\Community\\VC\\Tools\\MSVC\\14.34.31933\\bin\\HostX64\\x64\\cl.exe" , ] , "clangd.path" : "D:\\Scoop\\apps\\llvm\\current\\bin\\clangd.exe" , "clangd.fallbackFlags" : [ "-IC:\\Program Files\\Microsoft Visual Studio\\2022\\Community\\VC\\Tools\\MSVC\\14.34.31933\\include" , "-I${workspaceFolder}/src/includes" , ] ,
Xmake 设置工具链:xmake f -p mingw --mingw=D:\Scoop\apps\msys2\current\mingw64 -c
1 2 3 4 5 6 7 8 add_rules("mode.debug" , "mode.release" ) set_languages("c11" ,"cxx11" ) target("P2_6_1" ) set_kind("binary" ) add_files("src/chapter2/practice_2_6_1.cpp" ) add_includedirs("src/includes" )
调试 通过 xmake-vscode 插件配合 vscode 来实现对 c/c++ 项目的断点调试支持。
使用 WSL 在 VScode 上用 LLVM + Clangd + LLDB 高效编程 C++ 目的 想要在 VScode 上使用 clang 编译 + LLDB 调试 + clangd 自动补全这一套工具链。
安装工具链 1 sudo apt install clang clangd llvm liblldb-dev
VScode 插件 必装:
clangd
CodeLLDB
选装:
Clang-Format
Clang-Tidy
CodeLLDB 这里安装后需要下载一个包,一般会超时。
查看自己架构,一般是 X86_64
自己下载对应架构的包,下载链接 博客
配置 VScode settings.json 按下 Ctrl+Shift+P,输入 setting(设置),找到 WSL 的选项
1 2 3 4 5 6 7 8 9 10 11 12 13 14 15 16 17 18 19 20 21 22 23 24 { "clangd.arguments" : [ "--compile-commands-dir=${workspaceFolder}/build" , "--background-index" , "-j=12" , "--query-driver=/usr/bin/clang++" , "--clang-tidy" , "--clang-tidy-checks=performance-*,bugprone-*" , "--all-scopes-completion" , "--completion-style=detailed" , "--function-arg-placeholders" , "--header-insertion=iwyu" , "--pch-storage=memory" , ] , }
生成 Clangd 配置文件 clangd 对每个项目都需要生成一个名为 compile_commands.json 的配置文件,参见 官方文档
调试 通过 xmake-vscode 插件配合 vscode 来实现对 c/c++ 项目的断点调试支持。
其他配置 在项目的根目录下创建一个 .clang-format 文件,然后添加内容:
1 2 3 4 5 --- BasedOnStyle: Google IndentWidth: 4 DerivePointerAlignment: false PointerAlignment: Left
官方文档 Clang-Format Style Options — Clang 18.0.0git documentation (llvm.org)
VSCode 的 C++ 配置: clang++ 单文件编译和 clangd 检查 (可用于 macOS) 使用 clang/lldb 进行单文件编译和调试
确保 clang++ 已经正确安装(通过 clang++ -v 可以验证)
对于 macOS,运行 xcode-select --install 可以安装好本文用到的所有包
对于 Linux,下载 llvm 包,大概率包含了本文用到的所有包
vscode 已启用 CodeLLDB 插件(报错无法下载可以先按报错给的 url 用浏览器下载,然后手动安装)
卸载微软提供的 C/C++ 插件!!!也不要使用 Code Runner 插件。
tasks.json,放入.vscode 文件夹中
1 2 3 4 5 6 7 8 9 10 11 12 13 14 15 16 17 18 19 20 21 22 23 24 25 26 27 28 { "version" : "2.0.0" , "tasks" : [ { "type" : "shell" , "label" : "C/C++: clang++ build active file" , "command" : "/usr/bin/clang++" , "args" : [ "--std=c++17" , "-fcolor-diagnostics" , "-fansi-escape-codes" , "-g" , "${file}" , "-o" , "${workspaceFolder}/.build/${fileBasenameNoExtension}" "-fstandalone-debug" , ] , "options" : { "cwd" : "${fileDirname}" } , "group" : { "kind" : "build" , "isDefault" : true } , "detail" : "Task generated by Debugger." } ] }
我的习惯是把所有的可执行文件放到 ./build/ 文件夹下,如果不这么做的话,改变 3、4 步中的文件路径,以及忽略第五步
launch.json,放入.vscode 文件夹中
1 2 3 4 5 6 7 8 9 10 11 12 13 14 { "version" : "0.2.0" , "configurations" : [ { "name" : "C/C++: clang++ build and debug active file customize" , "type" : "lldb" , "request" : "launch" , "program" : "${workspaceFolder}/.build/${fileBasenameNoExtension}" , "args" : [ ] , "cwd" : "${workspaceFolder}" , "preLaunchTask" : "C/C++: clang++ build active file" } ] }
在文件夹里新建一个 .build 文件夹( macOS / Linux 必做)
按 F 5,就可以编译调试了
使用 clangd 自动补全、代码检查
确保已安装 clangd(应该和 clang++ 在一个包里的,通过 clangd --version 检查)
安装 VScode 插件 clangd
在工作区根目录下新建一个 compile_flags.txt,这是用来为 clangd 指定参数的,比如使用的标准或是标准库路径之类。内容就是编译选项,一行一个。这里只写了一个标准作为例子
一般来说 clangd 的参数是由 compile_commands.json 指定,由 CMake 等构建工具自动生成。但是由于在我的需求中对每一个文件都是相同的编译参数,所以可以手写 compile_flags.txt 统一管理。JSON Compilation Database Format Specification
我的习惯是直接放在 ~ 下(如果你的代码都放在你的~和其子文件夹里的话)
1 2 3 4 5 6 7 8 9 10 11 12 13 14 15 16 17 18 19 20 21 22 23 24 25 26 27 28 29 30 31 32 33 34 35 36 37 38 39 40 41 42 43 44 45 46 47 48 49 50 51 52 53 54 55 56 57 58 59 60 61 62 63 64 65 66 BasedOnStyle: LLVM AccessModifierOffset: -4 AlignAfterOpenBracket: Align AlignConsecutiveAssignments: None AlignOperands: Align AllowAllArgumentsOnNextLine: false AllowAllConstructorInitializersOnNextLine: false AllowAllParametersOfDeclarationOnNextLine: false AllowShortBlocksOnASingleLine: Always AllowShortCaseLabelsOnASingleLine: false AllowShortFunctionsOnASingleLine: All AllowShortIfStatementsOnASingleLine: Always AllowShortLambdasOnASingleLine: All AllowShortLoopsOnASingleLine: true AlwaysBreakAfterReturnType: None AlwaysBreakTemplateDeclarations: Yes BreakBeforeBraces: Custom BraceWrapping: AfterCaseLabel: false AfterClass: false AfterControlStatement: Never AfterEnum: false AfterFunction: false AfterNamespace: false AfterUnion: false BeforeCatch: false BeforeElse: false IndentBraces: false SplitEmptyFunction: false SplitEmptyRecord: true BreakBeforeBinaryOperators: None BreakBeforeTernaryOperators: true BreakConstructorInitializers: BeforeColon BreakInheritanceList: BeforeColon ColumnLimit: 0 CompactNamespaces: false ContinuationIndentWidth: 8 IndentCaseLabels: true IndentPPDirectives: None IndentWidth: 4 KeepEmptyLinesAtTheStartOfBlocks: true MaxEmptyLinesToKeep: 2 NamespaceIndentation: All ObjCSpaceAfterProperty: false ObjCSpaceBeforeProtocolList: true PointerAlignment: Right ReflowComments: false SpaceAfterCStyleCast: true SpaceAfterLogicalNot: false SpaceAfterTemplateKeyword: false SpaceBeforeAssignmentOperators: true SpaceBeforeCpp11BracedList: false SpaceBeforeCtorInitializerColon: true SpaceBeforeInheritanceColon: true SpaceBeforeParens: ControlStatements SpaceBeforeRangeBasedForLoopColon: false SpaceInEmptyParentheses: false SpacesBeforeTrailingComments: 0 SpacesInAngles: false SpacesInCStyleCastParentheses: false SpacesInContainerLiterals: false SpacesInParentheses: false SpacesInSquareBrackets: false TabWidth: 4 UseTab: Never
来源 VSCode 的 C++ 配置: clang++ 单文件编译和 clangd 检查 (可用于 macOS) | Yunfi’s Blog (yfi.moe)